
How to print

Welcome
Welcome to the United Spaces installation and user guide for printers:
You will need to complete an installation of Xerox Workplace Cloud. Once the installation is complete, you will be able to easily print to any printer using your mobile phone!
You will need to go through four steps if you have a Mac computer (Steps A-D), and three if you have a PC (Steps A, C, and D).
We will also go through how to print (Step E) and a trick you can try if you encounter problems during installation (Step F).
A. Register as a user
The first thing you need to do is register as a user:
1. Open your browser and go to:
Xerox Workplace Cloud – Welcome to Xerox® Workplace Cloud
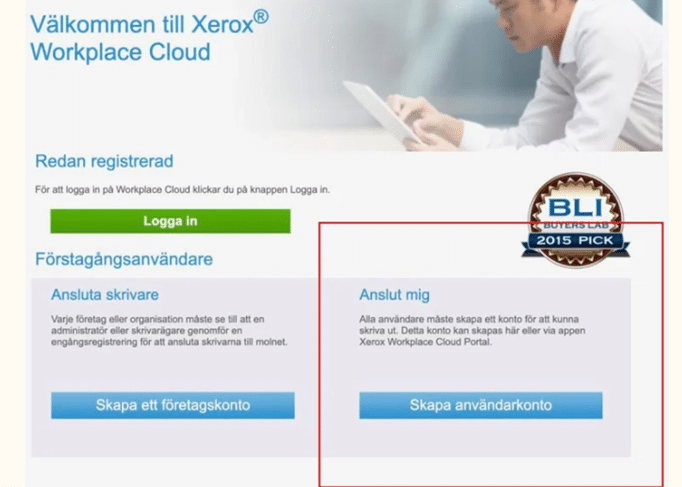
2. Click on “Create User Account”
2. Follow the steps and enter the company code 49N3GV
3. Log in.
B. Driver installation, note: Mac only!
Using a PC? Go directly to Step C
If you have a Mac, you now need to install the driver.
Click on this link.
Select your computer’s operating system in the “Platform” box (you can find which one you have under About This Mac in the Apple menu at the top left of your computer. It will state which version of macOS you have). Scroll down and click Download to download the print driver (macOS Print and Scan Driver Installer) that appears after you click Apply Filters. Double-click the downloaded file and double-click the box icon to start the installation.
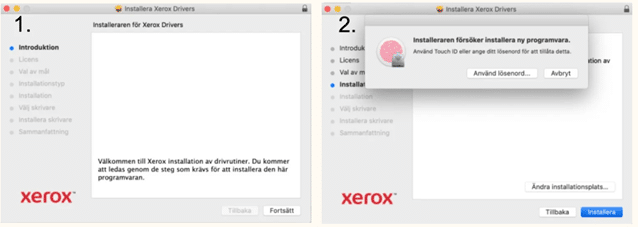
Click Continue until you reach Step 3 – Installation, and enter the password you normally use for your computer (see images 1 and 2 below).
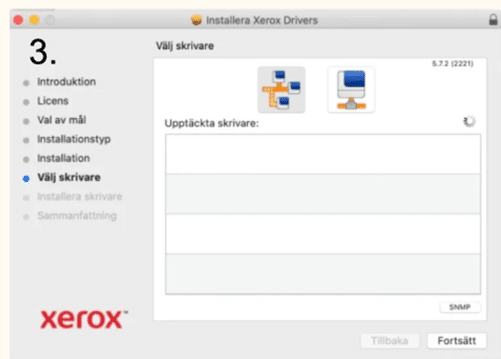
Do not select a printer. Do not select any printer; simply press Continue (see image 3 below).
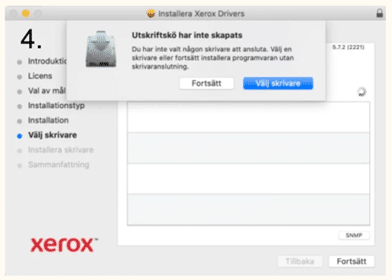
A box will appear stating “Print queue has not been created” (as shown in image 4 below). Do not worry. Simply press Continue.
A box will appear stating “Print queue has not been created” (as shown in image 4 below). Do not worry. Simply press Continue.
Installation complete! Proceed to Step C.
C. Client installation on computer
The next step is to install the client on your computer.
1. In your Xerox account that you created in Step A, click the “Desktop” tab.
2. Under the heading “Install to Workplace Cloud Client,” there are two links. One for Windows and one for Mac. Ensure you select the correct link.
When you click your link, a file will be downloaded.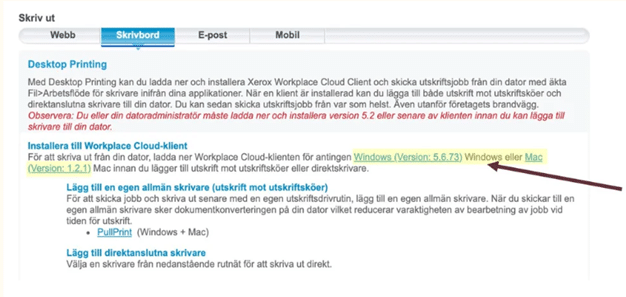
3. Open and run the file, then follow the instructions.
4. The printer will be automatically installed on your computer within one hour.
If it does not, follow the instructions under point F below.
5. Done! You can now proceed to Step D.
D. Installation for mobile device
The next step is to install the app on your smartphone, which you will use later to identify yourself when you want to print your documents.
1. Go to your App Store
2. Search for “Xerox Workplace”
3. Press “Download”
4. Open the application after downloading
5. Click on “Login”
6. Log in with the same credentials you provided in Step A.
7. Done! You can now proceed to Step E to print.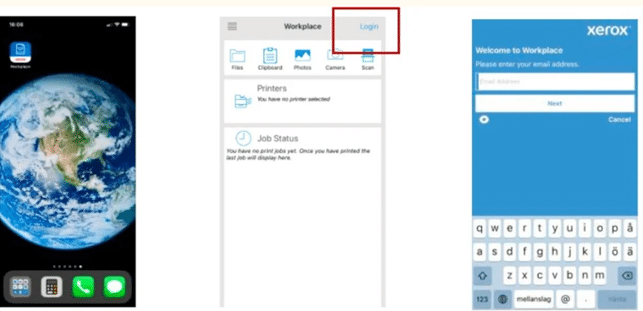
E. How to print
Now it is time to print!
1. First and foremost, ensure you are logged into Workplace Cloud.
Mac: On the right side of the menu bar at the top, you will find a printer icon; click it and ensure you are logged in.
Windows: Go to the system tray, click the printer icon, and log in.
2. Print the desired document as usual.
3. Go to the printer.
4. Open the app (which you downloaded in Step D) on your smartphone and log in with your credentials.
5. Click the “Unlock” symbol (see image below).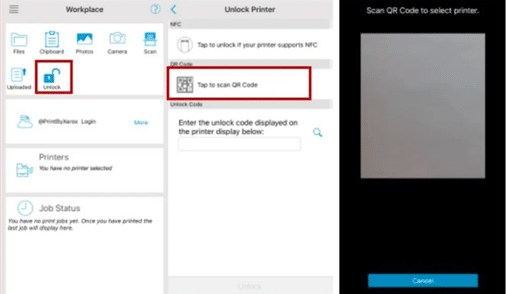
6. Click “Tap to scan QR code.”
7. A camera field will appear. Hold your phone over the QR code on the printer’s touchscreen so the QR code is visible through the field on your phone.
8. The QR code will be scanned automatically and log you in.
9. You will now see that you are logged in on the printer screen.
10. Click the “PrintbyXerox” icon.
11. Select your print job and click “Print.”
12. Log out of your account. Done!If the file/printer is not visible on your computer
F. Try installing the printer on your computer
1. Under the “Desktop” tab in your Xerox account, you will find the heading “Add your own public printer.”
2. Click the “iOffice” link under the heading “Add your own public printer” and a file will be downloaded.
3. Click the file and follow the instructions.
4. After installation, please restart your computer.
5. Done!